Friday, March 22, 2013

Nervous Thighs

I bought an eight-pack of boneless, skinless chicken thighs last week at Hannaford for $3.11.  Manager's Special (that's the only way I buy meat...Manager's Special, or if it has a coupon on it.) 

The thing is, thighs make me nervous.  I have two of my own and I can barely handle them.  But that buy was such a good deal...I was determined to find a way to cook them that was easy and tasted good.  I knew they wouldn't be chicken breasts, and I was just going to have to be ok with that.

After trolling the Pinterest, I found this recipe that sounded delicious, and had ingredients which I was sure I had at the house.  But the cooking directions said that the thighs would be broiled.  See, broiling makes me nervous.  The only thing I use my broil setting for is garlic bread.  What if the thighs weren't done?  What if the smoke alarm went beserk?  What if I had some more irrational worries?

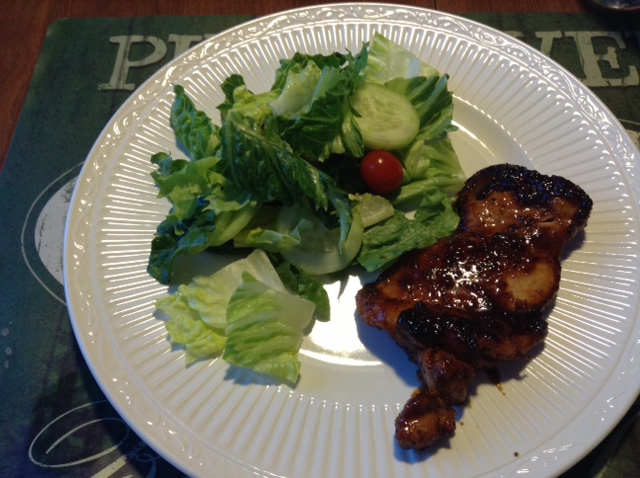
I opted to cook these in the skillet, and they turned out delicious.  I didn't even need a glass of wine or a Klonapin to cook them.

Here we go:

Honey Glazed Spicy Chicken Thighs

4 skinless, boneless chicken thighs
2 teaspoons garlic powder
2 teaspoons chili powder
1 teaspoon salt
1 teaspoon ground cumin
1 teaspoon paprika
1/2 teaspoon ground red pepper (I used McCormick's Red Pepper Shot, because that's what I had.  I was going to opt for red pepper flakes, cause I had that, too.  Use what you like or what you have.)
Olive oil
6 tablespoons honey
2 teaspoons vinegar

In a large bowl or large ziplock bag, combine the spices.  Add chicken thighs and toss to coat.  Heat non-stick skillet with olive oil and add the chicken thighs.  While the chicken thighs are cooking, mix the honey and vinegar (I eyeballed the honey because measuring honey is a pain...)  Once the thighs are cooked through, add the honey mixutre.  It will bubble and get all delicious.  See below.
Underestimated the size of my pan...so one little thigh got cooked by its lonesome...and then was tossed into the leftover sauce


Shannon and I feasted on this and salad, then tucked into Season 2 of Downton Abbey.  Andrew had a piece once he got home.  All votes were in favor of thighs.

I will never show you how much Ranch dressing I put on my salad to make it edible


Tuesday, March 19, 2013

PW and Angie

The Pioneer Woman is my obsession.  Partly because she cooks like weight gain isn't a side effect.  Partly because she gets to stay home and cook and rear (REAR!) her children.  Partly because she's married to a cowboy (Andrew is nothing to scoff at, but I don't know if he'd ever wear a cowboy hat for me.)  I don't get the cable, so I've only managed to catch her show once, but I've been an obedient follower of her website, and thanks to my generous m-i-l, I used my Christmas gift card to buy both of her cookbooks.  Now, seeing as I already own one mile of cookbooks, I was determined to make something of these books.  More than just show.  Put them to use!  (Also, putting my cookbook holder to use...it's hard to cook from a hardbound cookbook, y'all.)  So my plan is to cook through (or nearly through) both of her cookbooks.  Tonight, we start with her recipe for Scalloped/Au Gratin potatoes.  You can find her original recipe here, or if you have her new cookbook, it's on page 226.  Original recipe pasted below is from PW's website...italicized words are my own.

PW's Scalloped/Au Gratin Potatoes

4 whole Russet Potatoes, Scrubbed Clean (this makes so much!!!!)
2 Tablespoons Butter, Softened (I didn't use all the tablespoons...maybe 1/2-1 tbsp)
1-1/2 cup Heavy Cream 
1/2 cup Whole Milk 
2 Tablespoons Flour 
4 cloves Garlic, Finely Minced (the cookbook only calls for 3, so I used that and it was perfect for us)
1 teaspoon Salt 
Freshly Ground Pepper, to taste 
1 cup Sharp Cheddar Cheese, Freshly Grated (I used 2 cups, unfreshly grated, because more is more)


Preheat oven to 400 degrees.
Smear softened butter all over the bottom of a baking dish. (I used a 9x13 glass pyrex dish.)
Slice potatoes, then cut slices into fourths. (For future makings, I would cut the potatoes down smaller.  They cooked okay in fourths...I think it's just a psychological thing that I wanted the chunks to be smaller.  You could also dust off your mandolin and make paper thin slices.  Don't have a mandolin?  You can borrow mine.  But you'll have to dust it off yourself.)
In a separate bowl, whisk together cream, milk, flour, minced garlic, salt, and plenty of freshly ground black pepper.
Place 1/3 of the potatoes in the bottom of the baking dish. Pour 1/3 of the cream mixture over the potatoes.
Repeat this two more times, ending with the cream mixture. (The cookbook directions just have you chuck the potatoes in the dish and pour the cream mix over the potatoes.  That's how I did it.  I always favor lazy over more work.)
 Cover with foil and bake for 30 minutes. Remove foil and bake for 20 minutes, or until potatoes are golden brown and really bubbling. (I stirred up the potatoes that were on top because they weren't swimming in the delicious scallop/gratin sauce and I wanted to make sure they got their bath.)
Add grated cheese to the top of the potatoes and bake for 3 to 5 more minutes, until cheese is melted and bubbly.
Allow to stand for a few minutes before serving by the spoonful. Delicious! (Agreed!)

Potatoes are in the upper right corner, in case you mistook it for the salad

Friday, March 1, 2013

Sweet Heat Chicken Stir-fry

I never ate stir-fry before Andrew was tricked fell in love with me.  I was never one to gobble down rice, and with my as-is stomach, I'm bound to go all bird-on-a-wedding-day if I eat too much of it.  But I've come to accept the stir-fry for what it is, much as Andrew has come to terms with how the rest of his life will play out (read: full of cookies.) 

I'm not opposed to bottled stir-fry sauce.  It's how I make ours most often.  But I was lazy and didn't want to go to the grocery store after work yesterday (I had already been to the Bangor Post Office, which is like a perpetual Wal-Mart check out line)...I just wanted to go home.  So I found a recipe for sweet and sour sauce and we made some homemade stir-fry.

Please don't let the lack of a wok deter you in making this mighty, non-Asian dish.

Here we go:

2 chicken breasts, cut up into smallish chunks or slices
Olive oil
Red pepper flakes
1 bag stir-fry veggies (frozen)
1/2 c. vinegar
1/4 c. brown sugar
Pineapple chunks and their juices (I can't remember the size of the can I used...it was smallish, maybe 3 or 4 rings worth of pineapple?  You could use fresh pineapple, but you'll want some pineapple juice for your sauce)
1 Tbsp cornstarch mixed with 1 Tbsp water
Prepared rice (we went instant, because why should this meal have any nutritional value?)

In a large frying pan (or a wok if you're going old-school traditional on me), swirl a bit of olive oil in the pan.  Heat to med-medium high and add the chicken, cooking until browned on both sides.  I gave a shake or two of red pepper flakes at this point.  Totally optional if you don't have a fire-breathing dragon at home.  Add the veggies.  Cook until the veggies have started to heat through.  If you don't want to be lazy, you could heat the sauce up in a separate saucepan and then add to the stir-fry.  But let's just go my way, shall we?  Add the can of pineapple and all its juices, vinegar, and brown sugar.  Make your cornstarch slurry by mixing the cornstarch and water and add it to the stir-fry.  Give everything a stir and cover, reduce heat, and cook until sauce is thickened and the veggies are heated through.  I put the red pepper to it again, but don't feel like the heat is mandatory.  You can just have a sweet stir-fry, and no one will judge you.  I find that eating really hot food makes me eat less of it.  More room for snacktreats later on in the night.  Serve over rice.  Or not, if you have pigeon stomach.  On that note...

Take that, Oriental Jade!

Monday, February 25, 2013

Taco Biscuit

Meet Taco Biscuit.  My nephew created the name for this dish (original recipe found here) because he thought the meat filling looked like taco filling, and he thought the crescent rolls tasted like a biscuit.  I was just happy there wasn't too much negotiating for him to eat his portion.  He ate the whole thing.  After he told me he didn't think he'd like it because he'd never had it before.

It's really simple and you could add veggies, or change up the sauce or meat that you choose to use.  You could use reduced fat crescent rolls (or you can just tell your husband you used reduced fat crescent rolls.)  Here we go:

Taco Biscuit

1 lb hamburger
1 c. pasta sauce (we are a Newman's Own family, and our default sauce is Sockarooni)
1 tube of 8 count crescent rolls
1/2 cup shredded cheese (give or take)

Brown up your hamburger; add the pasta sauce.  Preheat your oven to 375 and lay out your crescent rolls.  I put 7 around the pie plate, tiny tips out, and use one to cover the middle hole it creates on the bottom of the plate.  I press it all together on the bottom to make a crust.  Sprinkle half the cheese on the bottom, then pour in the meat.  Fold the tiny tips over the meat and sprinkle with remaining cheese.  Bake 15-20 minutes.  Devour.

Enjoy (kids and adults alike!)

Saturday, December 15, 2012

Oh Fudge.

We (I) only make my gram's peanut butter fudge at Christmas time.  No better time than the dead of winter to pack on 5 (15) extra pounds in candy and sweets.  You need that extra layer of warmth.  Especially if you're too fit and are still going to the 6am gym classes that I go to.

Anyhow, this is my gram's recipe for peanut butter fudge.  I don't know if she got it from someone or someplace (I found "her" recipe for Fried Pecans in her Bell's Best cookbook!) but I attribute it to her.  Her chocolate fudge recipe is the same as on the small jar of fluff, so I'll just let you go to the Hannaford to get that recipe.

Peanut Butter Fudge
2 c. peanut butter
1 small jar fluff (7.5 oz)
2 c. brown sugar
2 c. white sugar
3/4 c. evaporated milk
2 sticks butter
3/4 tsp. salt
3/4 tsp. vanilla

Empty the peanut butter and fluff into a large bowl and set aside.  In a saucepan, put the sugars and evaporated milk and slowly melt on low heat.  Once it's all melted, bring up to medium and once it starts to boil (not mistaking the bubbles for air bubbles) add the butter and return to a boil for 5 minutes, stirring constantly.  Take off the heat and pour over the peanut butter/fluff.  Add vanilla and salt.  Beat until it's all mixed together and pour into a greased 9x9 pan and cool.

No meat mallet  is needed for this recipe.  Mine was there to keep Andrew from eating the pan of fudge.  He was banished to the wooden spoon and glass bowl remnants.

Thursday, December 6, 2012

Apple Raisin Stuffed Chicken

First thing's first:  you need to break your oven.  If you have Hellcats, ask them to take a break from ruining the Christmas tree to break your oven.  Or, you can be less dramatic (but what's the fun in that) and fire up your grill.  There's no snow on the ground, so there's still time to make this meal outside.

3 chicken breasts, pounded down so they're evenly thin (1/2 inch?  I'm bad with measurements...)
6 oz package of stuffing (I used Hannaford brand, cause it's only the best for my family)
1/2 stick of butter
1 1/2 c hot water
1/4 c raisins (or cranberries, if you mortally detest raisins.  Or no fruit if you're related to me)
1 apple, cut into small pieces
Small amount of oil (for oiling your cast iron skillet and to brush on the chicken)
Paprika (for making the chicken look not so pasty white)

Heat your grill to about 375.  You can also do this in the oven if you didn't have the heart to kill an appliance at Christmastime.  Pound the crap out of those chicken breasts, so they're even. 

Combine the stuffing, fruit, butter, and hot water and let sit for 5 minutes.  Spoon a small amount (maybe 1/4 c) on top of each chicken breast.  Roll up (they aren't gonna be eggroll small....they're gonna look like a fist.  But don't think about that when you're eating them.) Repeat with each breast and keep the remaining stuffing for the next step. 

Lightly oil your cast iron skillet.  Put the breasts, seam side down, into the skillet.  Lightly brush with oil and sprinkle with paprika.  Grill (or bake) for 20 minutes.  Add the remaining stuffing around the pan and cook for another 20 minutes or until the chicken is done.

The stuffing around the pan is crunchy on the bottom. The chicken is really moist.  This was a winner at the house.  You could add 1/2 c of walnuts or pecans, as the original recipe called for, but I forgot to add, and that would be super delicious as well.


I would be happy in a bed of stuffing

Peas.  Cause we needed more starch for this meal

Look at the stuffing!


Saturday, December 1, 2012

Slow Cooker Stuffed Peppers

Like a Sandals vacation, this meal is all inclusive.  Two veggies, a starch, and yer meat.  All in a couple hours.  It's fantastic.  Plus, it's delicious!  This was the first time I'd ever made or eaten stuffed peppers.  It's not as if they're exotic or made with expensive, hard-to-find ingredients...it's just not something that was ever on the menu at our trailer growing up.

But times have changed, and times are strange (as my good friend Ozzy sings) and I am making stuffed peppers.  Here we go:

1 crockpot
4 green peppers (or try different colored peppers if you want.  Be jazzy)
1/2 lb ground meat (If you chose to use 1 lb of meat (like I did), you should buy another pepper and see if you can squeeze it into your crockpot.  One pound of meat would make enough for 5 peppers.  I didn't have 5 peppers.  Some filling was sacrificed.  I used hamburger.  The original recipe called for ground pork.  You could try ground chicken, turkey, moose...really, whatever ground meat you could get your hands on.)
1 c. instant white rice (uncooked)
1 c. frozen peas (uncooked)
3/4 c. bbq sauce, divided (I used Weber Kick'n Spicy...and it was!)
4 oz Velveeta, cubed (ok, so the Hannaford at the Mall only sells their brand of Velveeta in 32 oz logs...but it made more financial sense to buy their 32 oz log than Velveeta's little 12 oz log...so now I have 28 oz of Velveeta at my house.  Not that I'm complaining...)
1/2 c. water

Combine 1/4 c. bbq sauce and the water in the bottom of the crockpot.  Cut the tops off your peppers and take out all the seeds and the membrane (is that what it's called?  That's what I'm calling it.)  In a medium bowl, combine your meat, rice, peas, and 1/2 c. bbq sauce.  Stuff the peppers evenly with the meat mixture, and stand them up in the crockpot.  Put one cube of Velveeta on each pepper.  Cook on low 7 hours or high 2 1/2-3 hours (I went the quick route.) 

You guys!  These were so good.  Andrew said that this was up there as one of his favorites.  I asked him what his other favorites were, and he said he couldn't remember.  I'm so good at taking compliments.

The cheese disappears, which is good if you have a Velveetaphobe for a husband, as I do...

Try these peppers!  I have never been so excited about eating a non-corn vegetable in my life!